Kubernetes is an open-source container orchestration technology that simplifies containerized application deployment, scalability, and management. Amazon Web Services (AWS) offers a fully managed Kubernetes service under the name Amazon Elastic Kubernetes Service (EKS).
You can install and manage Kubernetes clusters on AWS with EKS without needing to handle the underlying infrastructure. In this article, we will walk you through setting up and administering Kubernetes clusters on AWS using Amazon EKS.
Prerequisites
There are certain prerequisites that you need to fulfill before you start. These are given below:
- An AWS account with the necessary permissions to create an Amazon EKS cluster.
- An AWS Identity and Access Management (IAM) user or role with the necessary permissions to create and manage AWS resources.
- A Virtual Private Cloud (VPC) configured with subnets in at least two Availability Zones in your preferred region.
- The AWS Command Line Interface (CLI) is installed on your local machine.
Steps for Using Kubernetes Clusters on AWS with EKS
Step 1: Create an AWS EKS Role
The first step involves creating an EKS role that Kubernetes can take on to deliver the necessary resources. Log in to the Amazon Management Console, select Role, and then click New Role to create the EKS Role. Choose EKS from the list of Amazon Services, then click Next.
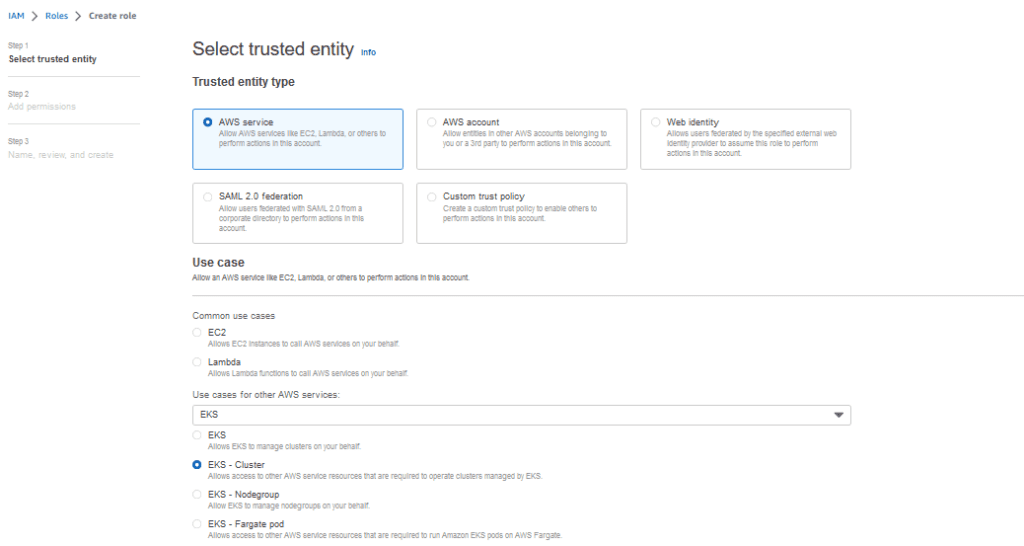
By default, it will select a predefined policy for role, which is:
- AmazonEKSClusterPolicy
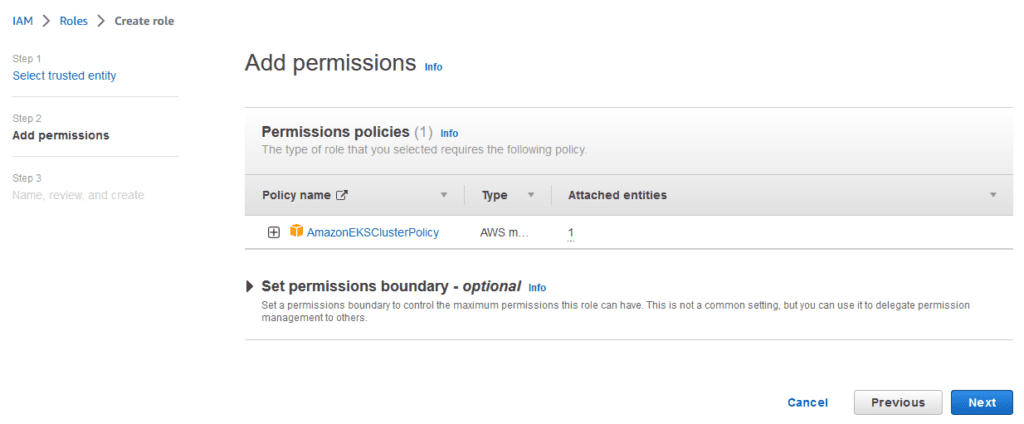
Click Next and Enter Role name. Review and create role.
Step 2: Configure VPC
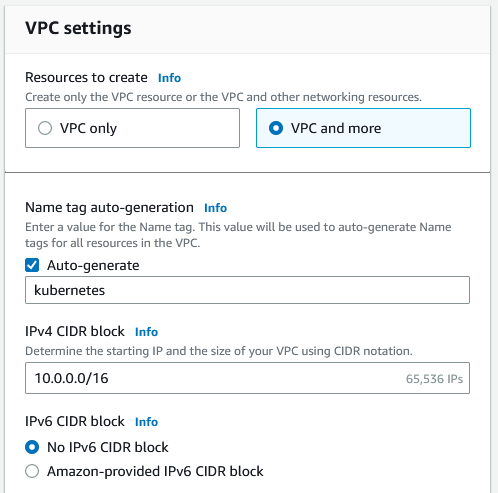
- Open the Amazon Virtual Private Cloud (VPC) console and click “Create VPC.” Enter the name of VPC and CIDR.

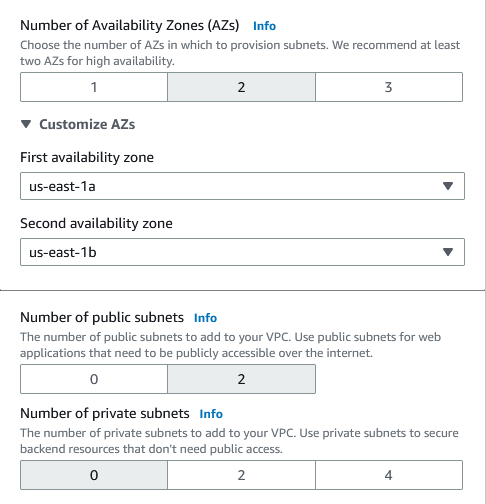
- Select the availability zones and the number of private/public subnets you want to create.

- Provide any further information needed and then click “create.” Next, create a security group for your EKS Cluster that meets the requirements. We will need this security group later.
Step 3: Create an Amazon EKS Cluster
The third step is to create an Amazon EKS cluster. You can use the Amazon Management Console, AWS CLI, or AWS SDKs to create a cluster. We will use the AWS Cloud Management Console in this how-to guide.
- Open the Amazon EKS console.
- Click “Create cluster. “

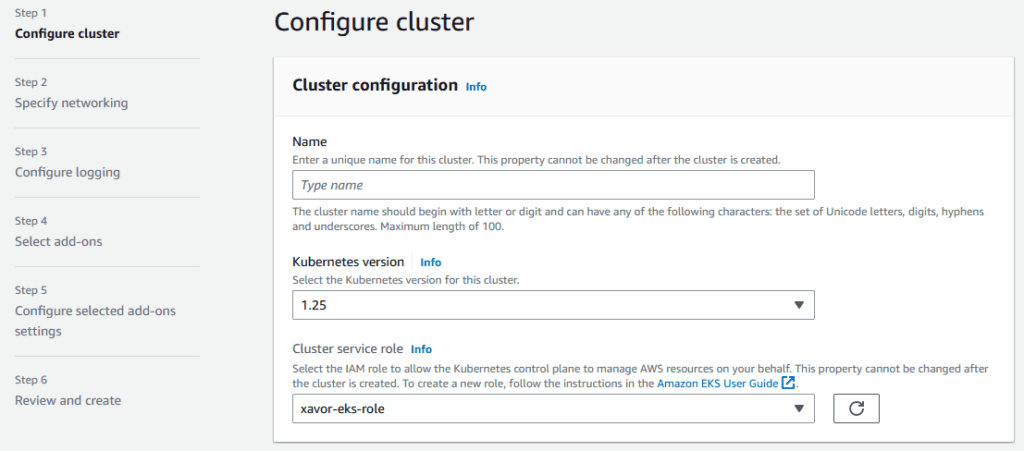
- Choose a name for your cluster and select the version and role you created earlier and click Next.
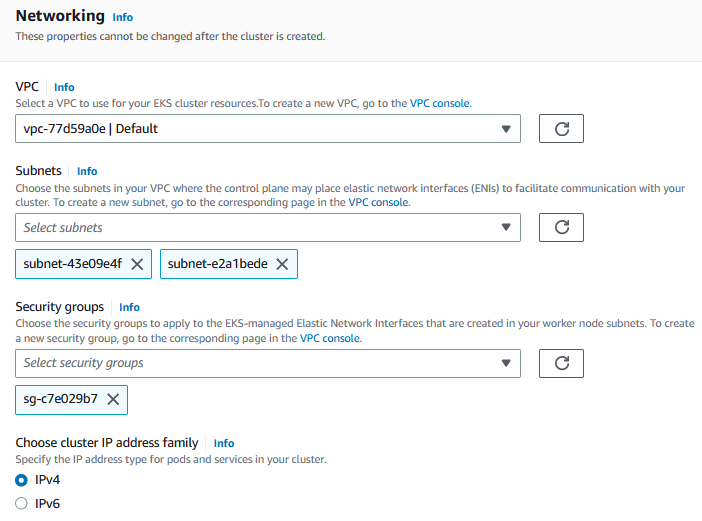
- Under “Networking,” choose the VPC and subnets we created earlier. Choose the security group you want to use with your EKS Cluster.

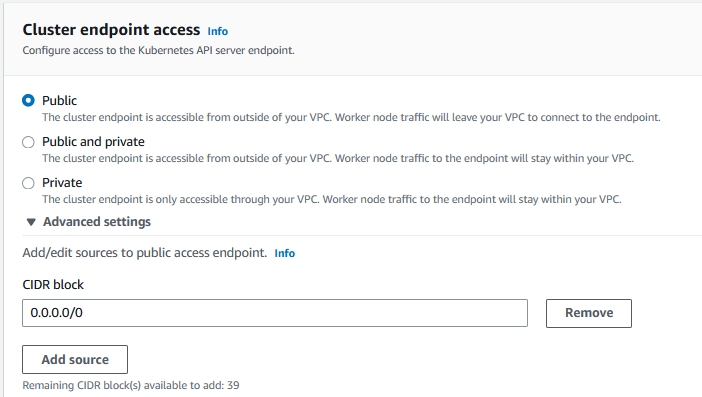
- Configure your cluster endpoints. For now, we will go with public endpoints.

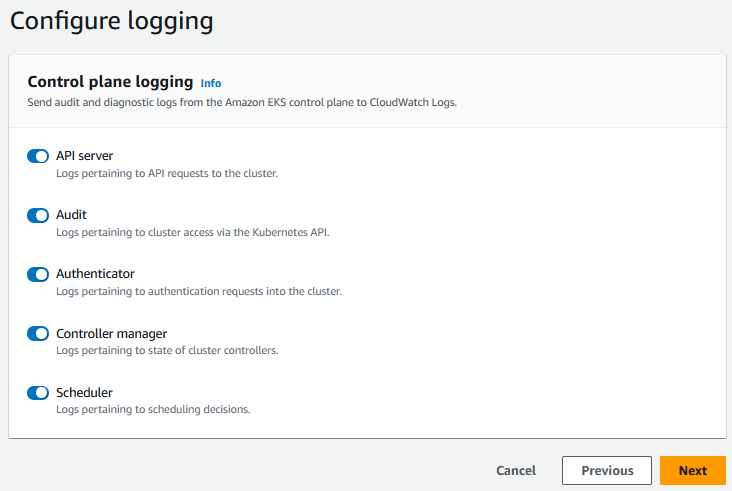
- Click Next to configure logging. You can select the type of logging you want.

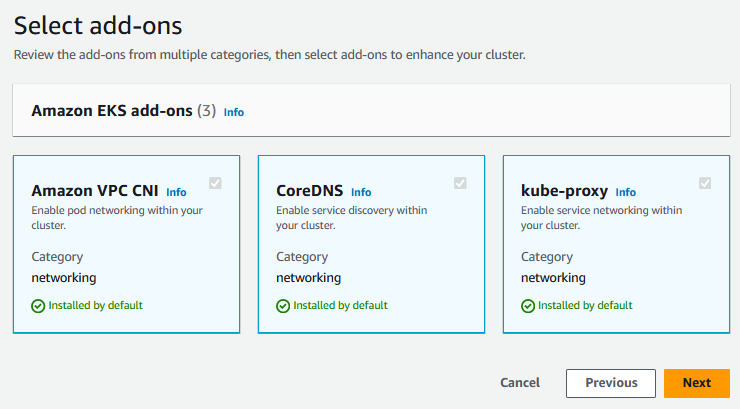
- Click Next to configure add-ons. Usually, these add-ons are installed by default.

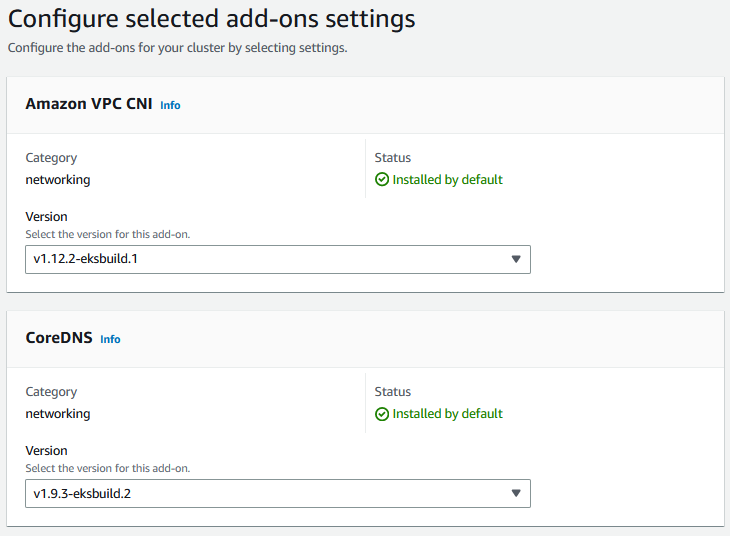
- Click Next to configure the selected add-ons.

- Click Next to review and create your cluster.
It can take some time to create something. With the kubectl command-line tool, you can access the cluster once it has been formed.
Step 4: Configure kubectl for EKS
Launch one EC2 machine, connect it with putty, and install kubectl, iam-authenticator, and AWS CLI on this machine.
Install kubectl:
https://docs.aws.amazon.com/eks/latest/userguide/install-kubectl.html
Install iam-authenticator: https://docs.aws.amazon.com/eks/latest/userguide/install-aws-iam-authenticator.html
Install AWS CLI:
https://docs.aws.amazon.com/cli/latest/userguide/cli-chap-configure.html
Use the command below to configure kubectl for Amazon EKS once you have installed kubectl and the AWS-CLI on your machine.
aws eks –region <regionname> update-kubeconfig –name <cluster-name>

You can see that the EKS cluster is configured with kubectl.
We can now test our configurations using the kubectl get svc command: kubectl get svc
Step 5: IAM Role for Worker Nodes
- Establish a role in IAM for worker nodes by following the instructions listed below.
- We begin by assigning the EKS worker nodes an IAM role.
- Access the IAM Console and select Roles.
- Choose EC2 from the list of Common use cases under Choose a use case, then choose Next: Permissions.
- Choose the following 3 policies from the Filter policies box.
AmazonEKSWorkerNodePolicy
AmazonEKS_CNI_Policy
AmazonEC2ContainerRegistryReadOnly
6. Role name, enter a name for your role, such as RoleForWorkerNode, then choose to Create a role.
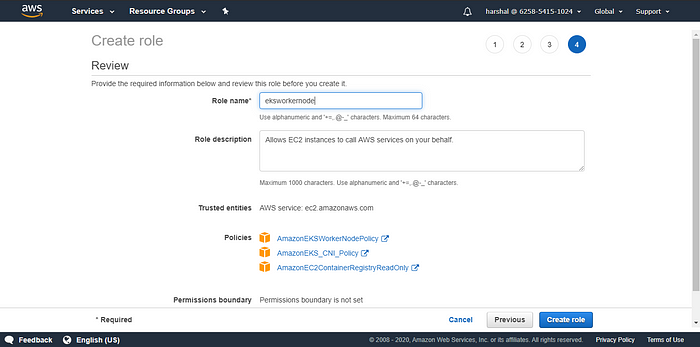
Step 6: Launch worker nodes
Go to EKS Console and click on Compute. There you will see Add Node Group. Click on Add Node Group.
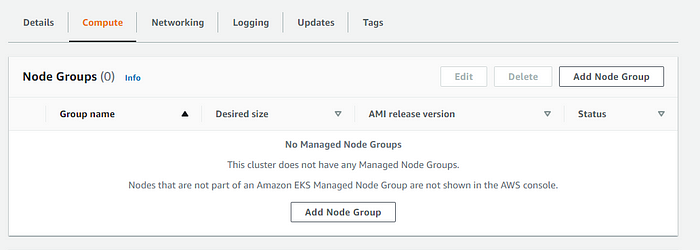
Configure Node Group
Select the IAM role which we created in the previous step (RoleForWorkerNode).
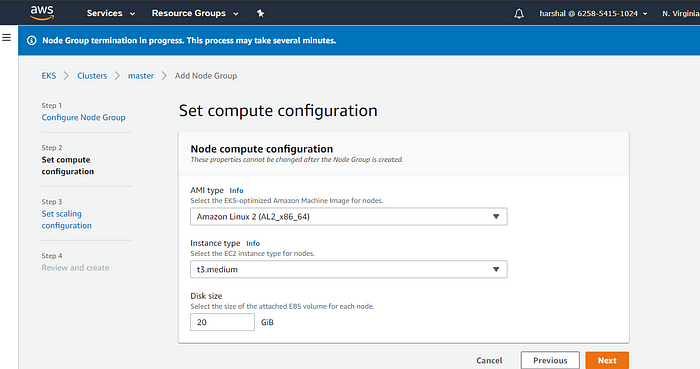
Set compute configuration
You will select the Image for Instance (AMI), instance size, and disk size for your worker nodes.
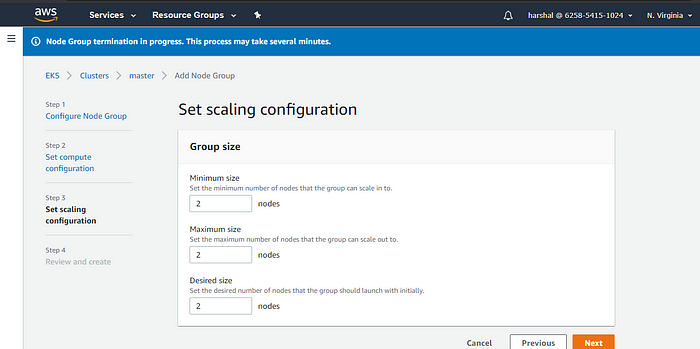
Set scaling configuration
You can select the maximum and minimum number of your nodes.
For example: if you select 2 as the maximum size, 2 worker nodes are created.
Review and Create
Review all your configurations like cross-check instance size, ami, node group size, and after reviewing all these details click on Create.
Check Status
Use kubectl to check on the status of your worker nodes: kubectl get node
Step 7: Deploy Applications to Your Cluster
Now that you have your cluster and worker node group set up, you can deploy your applications to your cluster. To do this, perform the following steps:
- Create a Kubernetes deployment file for your application, specifying the container image and other settings.
- Use the kubectl command-line tool to apply the deployment file to your cluster.
- Monitor the deployment status using kubectl commands and the Amazon EKS console.
For example, the following command deploys an NGINX container to your cluster:
$ kubectl create deployment nginx –image=nginx
You can then monitor the deployment using the following command:
$ kubectl get deployment nginx
Optional: Scale Your Applications
One of the key benefits of using Kubernetes is the ability to scale your applications up and down as needed. To scale your applications, perform the following steps:
- Update the deployment file for your application to specify the desired number of replicas.
- Use the kubectl command-line tool to apply the updated deployment file to your cluster.
- Monitor the scaling status using kubectl commands and the Amazon EKS console.
For example, the following command scales the NGINX deployment to three replicas:
$ kubectl scale deployment nginx –replicas=3
Conclusion
To sum up, Amazon EKS is a powerful and fully managed Kubernetes service provided by AWS that allows you to deploy and manage Kubernetes clusters on the AWS cloud. This article has provided a step-by-step guide on how to create an Amazon EKS cluster, create a worker node group, and deploy Kubernetes applications to the cluster.
By using Amazon EKS, you can take advantage of the many benefits of Kubernetes clusters, including container orchestration, scalability, and portability, while reducing the operational burden of managing the underlying infrastructure. Additionally, AWS provides a variety of tools and services that can help you optimize the performance and cost of your Kubernetes workloads, such as AWS Auto Scaling and spot instances. For legal matters related to AWS usage and compliance, it may be beneficial to hire an Amazon lawyer to navigate complex contracts and agreements.
Overall, Amazon EKS is a great option for organizations that want to leverage the power of Kubernetes in the cloud.
Xavor is an AWS partner. We offer a host AWS cloud services to enable our clients to unlock their cloud potential. If you want to up your cloud game, drop us a line at info@xavor.com. Our DevOps & Cloud team will get in touch with you to discuss how Xavor can help you achieve your goals.


